


Why upgrade your RAM?
RAM (Random Access Memory), or “random access memory,” is a computer’s short-term memory. It allows the computer to temporarily store data it needs right now or that it will need to access soon. This saves the computer from having to comb through all the information on its hard drive. In other words, the computer loads data into RAM to access it more quickly.
That’s why upgrading RAM can speed up a PC or increase its performance. The more RAM a computer has, the smoother it runs: faster boot times, more active browsing tabs, more FPS (frames per second) for games, more freedom to multitask with different applications, better user experience…
If this is what you’re looking for, read our complete guide on installing memory in a PC.
What is RAM upgrading?
Upgrading a PC’s RAM gives it the essential resources it needs to temporarily transfer data from the hard drive to the processor and process it. Even the fastest hard drives (SSDs) are slow compared to the speed at which RAM can deliver information to your computer. Without RAM, or without enough RAM, your computer wouldn’t even be able to function or would be terribly slow.
Typically, RAM is added to:
- • Speed up a computer
- • Navigate faster
- • Optimizing a PC for Gaming
- • Avoid incidents while editing videos or photos
- • Optimizing an old PC
In any case, it’s about making a PC faster and more powerful.
Does the operation present any risks?
Nothing ventured, nothing gained! Manually installing RAM is not without risks. For one thing, you expose your computer’s internal components (just like every time you open your computer out of curiosity or to dust it ). For another, you risk losing the manufacturer’s warranty.
Before upgrading your RAM, carefully consider the factors we are going to present to you.
How to choose a RAM?
Before choosing RAM for your PC motherboard, you should ask yourself the following questions:
- 1. How much RAM is installed on my PC?
- 1. How much RAM do I need?
- 1. How much RAM can my PC support?
- 1. What type of RAM do I need?
The answers to these questions should guide you in choosing your RAM.
How much RAM is installed on my PC?
First of all, check the amount of RAM installed on your PC. Note: You are not looking to know the storage capacity of your computer (the hard drive), but rather the memory available on your computer.

On Windows 10, right-click the taskbar and select Task Manager (or use the shortcut Ctrl + Shift + Esc ). Click the Performance tab and then click Memory. The data is in gigabytes (GB).
How much RAM do I need?
If your RAM isn’t enough, how much do you need? It’s not a matter of installing too much or too little RAM.
To determine how much RAM you need, consider these criteria:
- • Primary Use: What do you primarily do with your computer? For intensive tasks that require more RAM (gaming, video editing, etc.), plan for 16 GB. For web browsing or word processing, 8 GB should be sufficient.
- • Budget: RAM isn’t cheap! You can find great deals online, but we recommend purchasing from reputable manufacturers who offer a warranty and return policy.
- • Maximum capacities: Not all PCs have the same capacities. Don’t buy more RAM than your PC can handle. To find your PC’s RAM capacity, continue reading this article.
Generally, 4GB of RAM is a minimum, but if you have the budget, buy 8GB. With 8GB of RAM, you’ll already see much better performance. However, don’t go for 16GB of RAM if you’re not doing intensive tasks on your PC.
How much RAM can my PC support?
Before adding RAM to your PC, check a few things first. On all PCs, the motherboard and operating system have a maximum RAM capacity limit. The lower of the two limits represents the maximum RAM capacity for your PC.
Find the RAM capacity supported by a motherboard
The motherboard can handle a certain amount of RAM and has a certain number of slots (slots for inserting memory sticks). Take these factors into account.
Do you see the 4 slots in the top left corner of this motherboard? That’s where the RAM is located. There are 4 slots available on this motherboard, which is the most common slot these days.
First, identify your motherboard type. If you’re not comfortable with this, you can use a third-party tool like CCleaner’s Speccy: it will tell you all the important information about your computer without you having to search for it. To find out the maximum amount of RAM your motherboard can support, you can also consult its manual or its manufacturer’s website (identify its model).

There are various sizes of memory sticks, so if you don’t have many slots, you can buy larger sticks. For example, if your motherboard only has 4 slots and its RAM capacity is 32GB, you can install four 8GB sticks.
Make sure your RAM is compatible with your motherboard. DDR3 is the older generation of RAM, and DDR4 is the latest generation. A motherboard with DDR4 slots will not support DDR3 memory sticks, and vice versa.
Find the RAM capacity supported by an operating system
All 32-bit Windows operating systems are limited to 4GB of RAM. Even if your motherboard can support more, your operating system won’t be able to do anything with it, and you’ve just bought RAM for nothing.
64-bit operating systems can handle more RAM, but their limits vary from OS to OS. Windows 10 Home (64-bit) can accommodate up to 128GB of RAM, while Windows 7 Home Premium (64-bit) can only accommodate 16GB of RAM. To find out how much RAM your operating system can support, check online.
What type of RAM do I need?
If you’re shopping for RAM online, the various descriptions may seem overwhelming. To help you understand its exact specifications, here are some definitions.
- • DDR4-XXXX (e.g., DDR4-3200): This is the frequency of RAM. The cheapest and most common RAM currently ranges from 2133 to 2666 MHz. Gamers and content creators, however, may require more power (3200, 3600, 4000 MHz or higher).The higher the frequency (or “clock speed”), the more calculations the RAM can perform per second and therefore handle more activity. For example, after several internal tests, our average gaming performance increased by about 15% with 4266 MHz RAM (compared to pedestrian speeds observed with 2666 MHz RAM).
- • CLXX/Timing: This is the latency of a RAM. It corresponds to the time it takes for the RAM to send data to the motherboard pins. In some descriptions, you might find CL16-18-18-38, for example. Here, the RAM must execute 16 clock cycles to complete a task. To learn more, check out this complete technical analysis of latency times and their impact.Note: The lower the latency, the better the memory performance. Memory with very high clock speeds (4600 or even 5000 MHz) will have higher latency, which can affect performance. For many gamers, the ideal range is between 3600 and 4200 MHz. Personally, I chose a 4266 MHz kit with a CL 19 latency.
- • Dual Channel vs. Quad Channel: RAM typically comes in two sticks (or “modules”) in a “dual-channel” package, effectively doubling the data transfer rate. On professional workstation PCs, typically equipped with an Intel Core X or AMD Threadripper processor, the memory medium can even be quad-channel. Once you’ve identified your processor or motherboard type, you can determine which configuration you need (Dual Channel or Quad Channel). Dual channel performance is slightly better overall, so consider this kit if you can. However, the speed effects of quad-channel memory are limited.
How to Upgrade RAM on a Desktop PC
Once you’ve purchased the right amount of RAM, you can upgrade your memory. Here’s how to add RAM to a desktop PC:
- 1. Turn off your computer and wait for it to cool completely.
- 2. Unplug all cords, cables and accessories.
- 3. Open your computer case. For instructions specific to your PC, consult its manual. You will likely need to unscrew it. Memorize the location of each screw (they may not all be the same size or type).
- 4. Touch an unpainted metal surface of the case to discharge any static electricity your body may have built up. This will prevent damage to your computer’s sensitive components.
- 5. Find the RAM (you can consult the manufacturer’s manual).
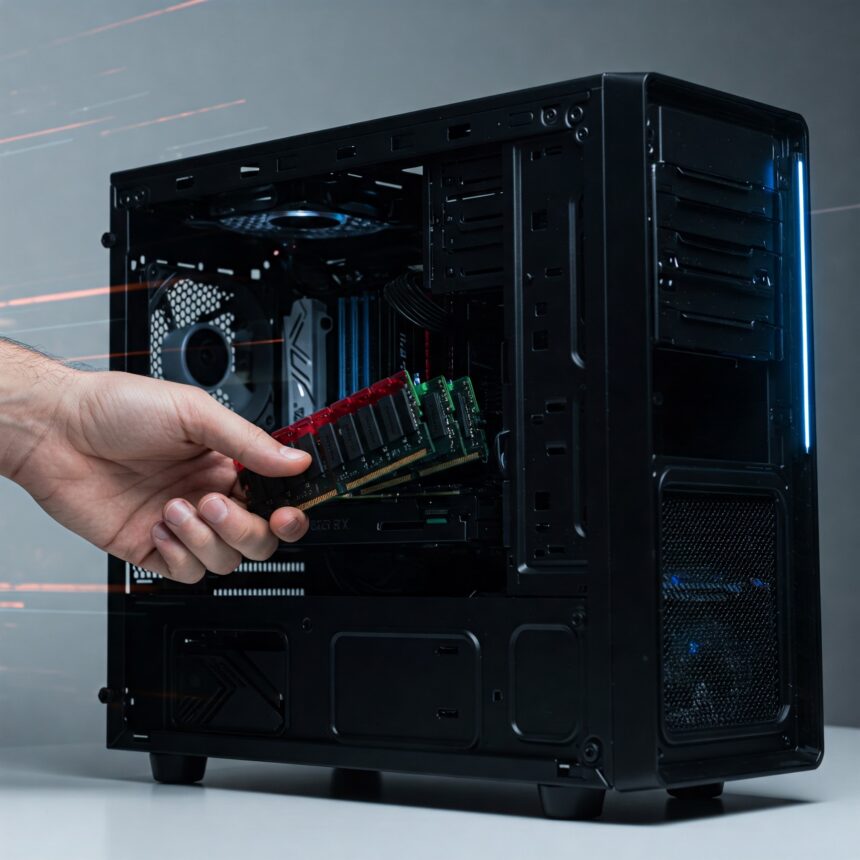
- 6. Gently remove the RAM sticks from the slot. If your computer uses clips to hold the sticks in place, push them outward. You should be able to remove the RAM stick more easily.
Carefully insert your new RAM sticks by placing the edge with the gold connectors into the RAM slot and pushing the stick in. Make sure the notch on the stick is aligned so it fits into the slot. Hold your RAM sticks only by the edges, and never touch the gold connectors !
- 1. Replace the computer case.
- 2. Reconnect all cables and connectors.
How to Upgrade Laptop RAM
Can you increase the RAM in a laptop? Yes, as long as you haven’t reached the maximum RAM capacity of your system! To find out how much RAM your laptop can handle, you need to ask yourself the same questions as you would for a desktop computer.
That said, some laptops may not support RAM upgrades at all. RAM sticks are sometimes soldered directly onto the motherboard, and you can’t remove them yourself. Check online to see if your laptop’s RAM can be replaced.
If your computer can support more RAM, here’s how to install it:
- 1. Turn off your computer, close it, and let it cool down.
- 2. Unplug all cords, cables and accessories.
- 3. Turn it over and place it on a flat surface.
- 4. Open the bottom case, or remove the part that covers the RAM. These details may vary depending on your laptop type. If you need to unscrew the case, memorize the screw locations carefully, as they may not all be the same size.
- 5. Touch an unpainted metal surface of the case to discharge any static electricity your body may have accumulated. This will help protect your laptop’s sensitive internal components.
- 6. Remove the RAM sticks by gently prying apart the clips holding them in place. The RAM sticks should pop out slightly. You can then remove them from their slots.
- 7. Only handle your RAM sticks by the sides. Never touch the gold connectors or any of the components on top of the stick!
- 8. Align the notch on the memory stick so that it fits into the slot. Push it in until it is fully seated.
- 9. Press the RAM stick flat into your laptop. The clips should snap back into place.
- 10. Replace your laptop’s back case, turn the computer over, and then reconnect all your cables and cords.
Check RAM upgrade
Once the RAM installation is complete, turn on your computer and check its RAM memory to make sure everything is working properly. You can return to Task Manager (see above) or go to the Windows menu, type This PC, right-click on it and select Properties.

In System > Installed Memory (RAM), the total should match the RAM you just installed. If so, congratulations, you’ve successfully added RAM!
Where to buy RAM
You can buy RAM online or from a computer hardware retailer. In any case, buy it from a reputable supplier and do your research beforehand: Does it offer a good warranty? Does it have a return policy? RAM is expensive, and you need to be covered in case of a purchasing error or product malfunction.
Installing RAM is generally the safest option, but it’s also more expensive. You can also buy RAM from a computer component supplier. Be careful: You’ll save money on your new RAM, but your warranty won’t be as long. Finally, you can buy used RAM, but this is at your own risk and there’s no after-sales service.
PC performance isn’t all about RAM
Contrary to popular belief, RAM is not the main engine of a PC. If you don’t optimize the rest of your PC, it will always slow down, no matter how much RAM you have installed.